Git & Github: Need of Developers
In this tutorial, I will explain how Git & Github works and how we can start with it.

I want to share my experience with Git & Github. When I started, I am confused with git init, add, push, commit, etc. I think that was my good experience because if that time I stopped myself then I can’t make it easy to learn new things as well. It helps me a lot to learn new things and contribute to open-source. I think many people want to learn or explore things but they are scared to start or maybe they are afraid to fail. so I decided to write this blog, so it can help them to start.
Git is a command-line tool. It is used to tracking changes in the source code, enabling multiple developers to work together on non-linear development. While Github is a Git repository hosting service, It contains many other features too, Github is a web-based interface.
This is an overview of Git & Github, now start with how can we setup Git & Github.

How to Install?
Setup:
Download Git for Windows:
Download Git for Linux:
Download Git for OSX/macOS:
How does Git works?
Once you have Git installed on your system, sign-up on GitHub and create your first remote repository.

This will be your remote repository where you and other developers will push their changes. When you create a repository, it will be empty, meaning that it won’t contain any code.
So initially, you need to push some code so that other developers can also work on it. Make sure to copy the link of the remote repository which will be available to you once you click create repository button. This will be used to link your local codebase to the remote one.
When you are working on some code, you will be working on a local copy. That means you will be working on a repository that is available on your local system like a PC or a Laptop. Once you have completed the updates you had to do, you have to push that code to a remote repository. Hence Git must know where the repository is located. Hence we need to provide Git with the remote repository URL we just copied. Once Git knows where the remote repository is, it can keep the local repository in sync with the remote repository on demand.
So first, let’s create a local repository and add some code. Here I am using python code.
Let’s make a sample folder with the name which is the same as the repository name we created on GitHub. I am working on Linux, You can use any one above.

Configuring Git
After Git is installed on your system, you need to configure Git so that it can understand who is pushing the code to the remote repository, as many people could be working on the project. The most important configurations are the username and the user’s email. This can be set up using the following commands.
git config --global user.name "your name"git config --global user.mail "yourname@provider.com"

After this, Git on your system will use these credentials every time you push some code to the remote repository. You can view all Git configurations using the command below.
git config --list
Initializing Git Repository
We created a folder git-repoThis will be your local repository. After doing that, open the terminal window from within that folder.
First of all, we need to make this folder a Git repository. It will be done by executing the command below.
git init
After executing git init creates a .git subdirectory in the current working directory, which contains all of the necessary Git metadata for the new repository. This metadata includes subdirectories for objects, refs, and template files. A HEAD file is also created which points to the currently checked out commit.
Git doesn’t know where is our remote repository is located, we need to instruct Git to link it with the remote repository using the command below.
git remote add origin repo-url
repo-url refers to the remote repository URL we copied earlier. origin is a short name for this long URL which comes in handy whenever we have to push some code to the remote repository
You can check remote repository by using the command below
git remote -v
It will show you like this

As of now, We initialized git repo and remote repository in our local system. Now we have to learn about how Git works.
Workflow of git
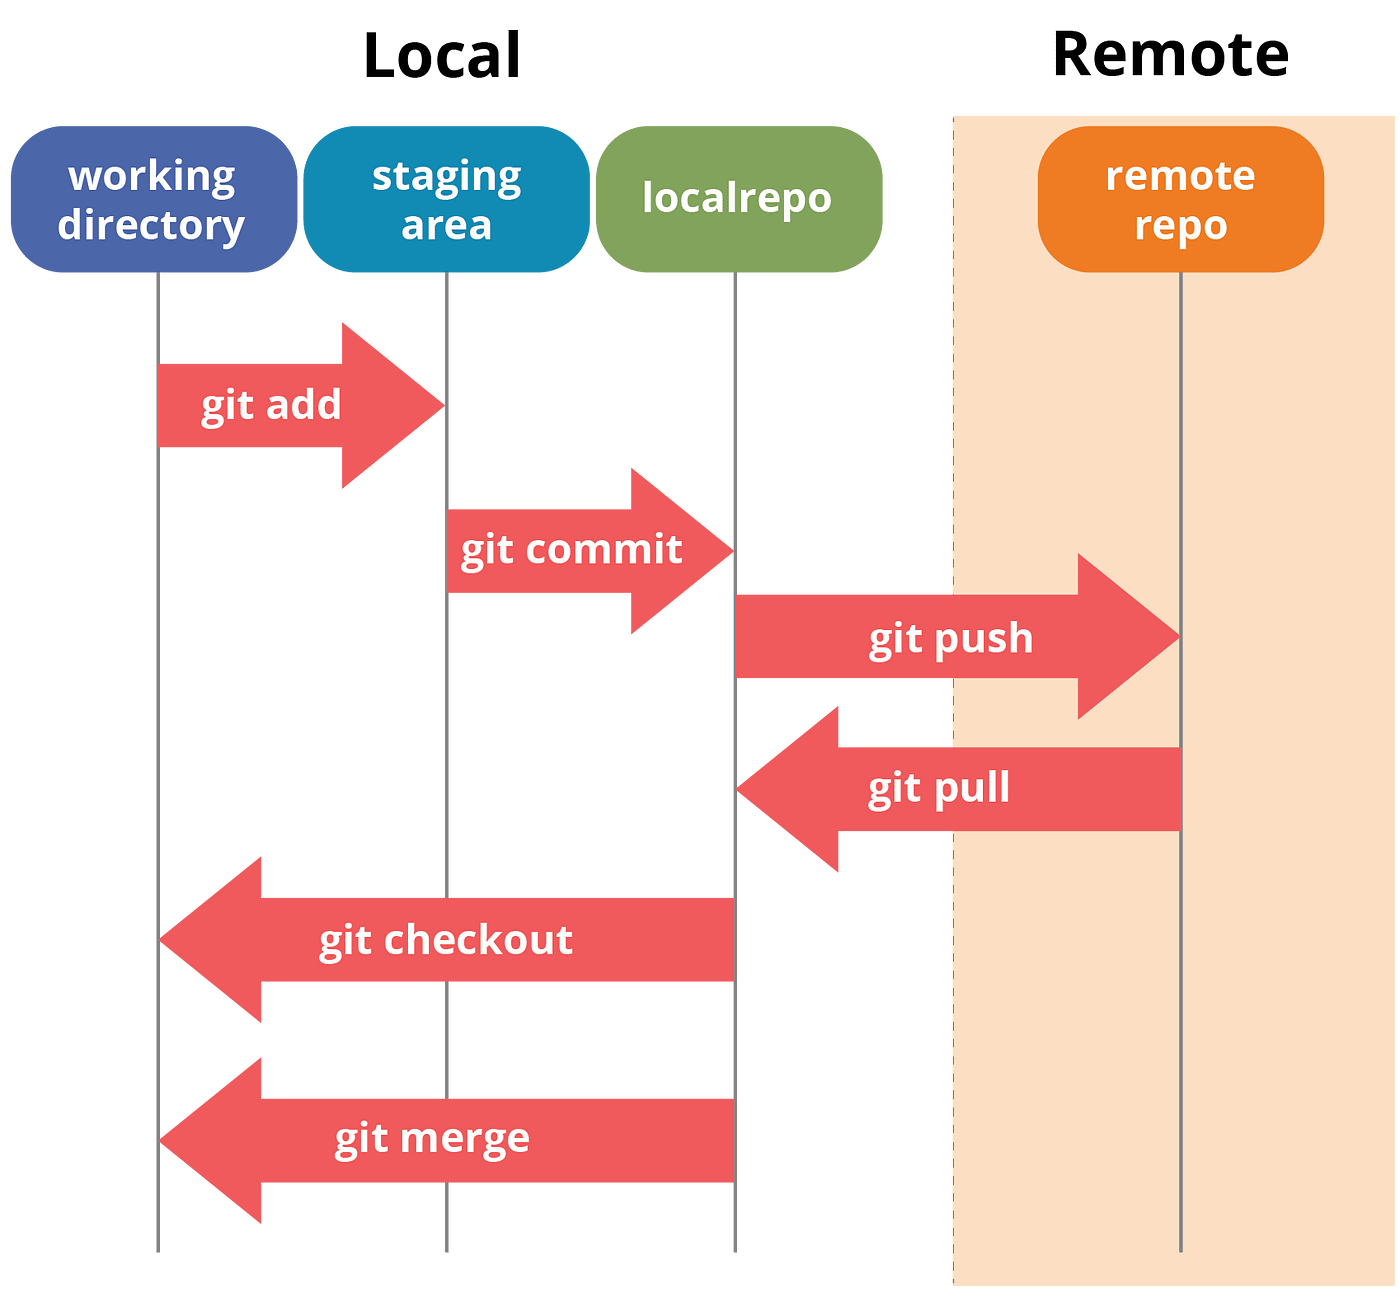
Whenever we create a file or modify an existing file(that can be committed, staged or unstaged) that files by default goes into our working directory/Area. The working area is where files that are not handled by git. These files are also referred to as “untracked files.”
Staging area is files that are going to be a part of the next commit, which lets git know what changes in the file are going to occur for the next commit.
Commit set a message about the changes you were done. The commit also saves a revision of the code and you can revert the code to any version anytime in one click.
Now let’s do the practical
So first, let’s create a file called “hello.py” and add some code. Here I am using python code.

After saving this file we can see the status of the file using the command below
git status

So “hello.py” is untracked file as of now so we have to add it into the staging area by using this command
git add .

This file is now in a staging area and ready to commit. For your understanding, I used here “.” with git add command you can also specify file-name. There can be many files so if you want to add all the files into the staging area you can use “.” and maybe you want to do some changes in other files before adding to the staging area so you can specify file-name.
Now we have to commit our changes in the file. so Git keeps track of the files.
For commit our change, We have to use this command
git commit -m "intial commit"

- -m option is used to describe what we have done in our file. “initial commit ” is our description of what we have done.
You can see your commits by using this command

This command shows you the author of this file and date of committing the file with a commit message.
So far, our first commit is located in the local repository and the remote repository has no idea of its existence. Hence we need to push that commit to the remote repository. That can be done using the command below.
git push -u origin master
git pushcommand is used to push our local files to the remote repository.
Her master is a default branch whenever we initialize our git and create some file it will by default goes into the master branch we can also create different-2 branches we will discuss branching concept in future tutorials.

This command will ask you for user credentials. But when you push again with new commit then it will again ask you for user credentials. For storing user credentials we can use the command below
git config credential.helper store
After execution of this command whenever you push your next commits it will ask you for user credentials and then save it, So in the future, it will not ask you for user credentials.
Now we can check our files on the remote repository which is on our Github repository by going on Github account using any browser you want.

So we have successfully pushed our files to the remote repository.
Now you can check the content of the file by clicking on the file on Github.

Now we can use git pull <url> command to pull the files or repositories in our local system.
If repository is set as public then anyone can pull our files into there local system. That is how open-source works with git.
That’s all! I hope you enjoyed reading. Please 👏 (clap) and share if you find this post useful.
